How to Use Snowflake Marketplace Without an Account
You’ve seen a listing on the Snowflake Marketplace (hopefully from The Proptech Cloud 🙂 ) and you want to access the data for your business or project, but don’t have a Snowflake account – what do you do?
Keep reading, we will show you how to get started.
Prerequisites
You have a Cloud account (AWS is The Proptech Cloud’s preferred but GCP and Azure work just as well), and 5 to 10 mins to spare time!
Step 1 – Get access to Snowflake
The easiest and fastest path is to start a free 30-day trial of Snowflake from the Snowflake website.
Read more about the Snowflake trial accounts before you get started.
Note: Once the trial expires you will need to enter credit card in order to keep using Snowflake.
A trial account is enough to get you access and started, but for ongoing integration with the Marketplace you are better off converting to a paid account by entering a credit card.
When setting up your account, ensure the region and Cloud provider matches your Cloud Region and Provider.
An alternate approach is to request the data provider create a Reader Account for you on Snowflake. Given there are costs associated with this for the data supplier, it isn’t likely option for free Snowflake Marketplace listings. For paid subscriptions, particularly listings that have higher pricing, this could be a possibility.
The following diagram depicts how both options work (note the Consumer Account is where consumer starts their own Snowflake account):

Because a Reader account does not have a licensing agreement with Snowflake, support services are not available to the general users in the account. Instead, as the provider of the account, you field questions and requests from users in the account and respond as appropriate.
Step 2 – Setting up your Cloud environment
The following section will describe a set up on AWS, but similar steps are required for each of the major Cloud providers.
The following diagram depicts the type of infrastructure we will be setting up.

Create a S3 Bucket
a. Log into the AWS Management Console.
b. From the home dashboard, choose S3.
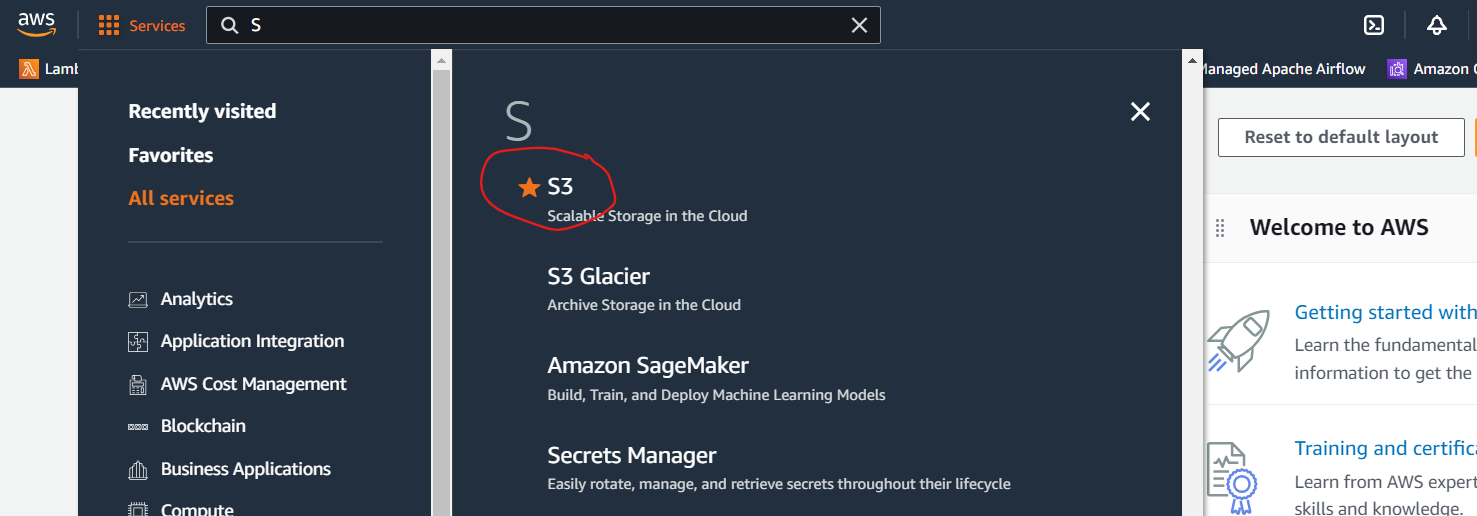
c. Click Create bucket

d. Enter a Bucket name and any other information your organisation requires.
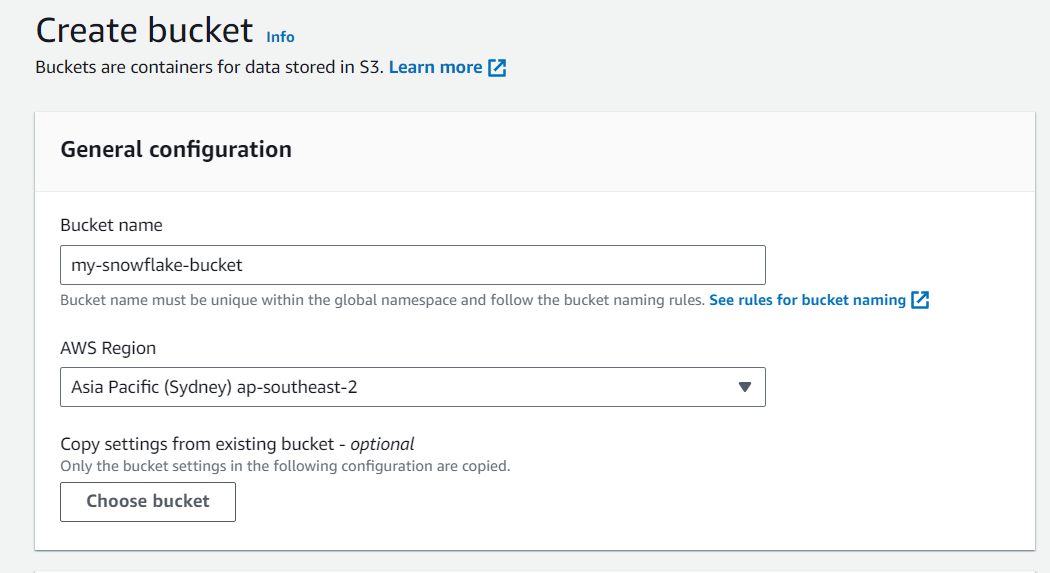
e. Click Create bucket to finish the creation.
Create an IAM role that Snowflake can assume to access your S3 bucket
1. From the home dashboard, choose IAM.

2. Choose Account settings from the left-hand navigation pane.
3. Expand the Security Token Service Regions list, find the AWS region corresponding to the region where your account is located, and choose Activate if the status is Inactive.
4. Choose Policies from the left-hand navigation pane.
5. Click Create Policy:
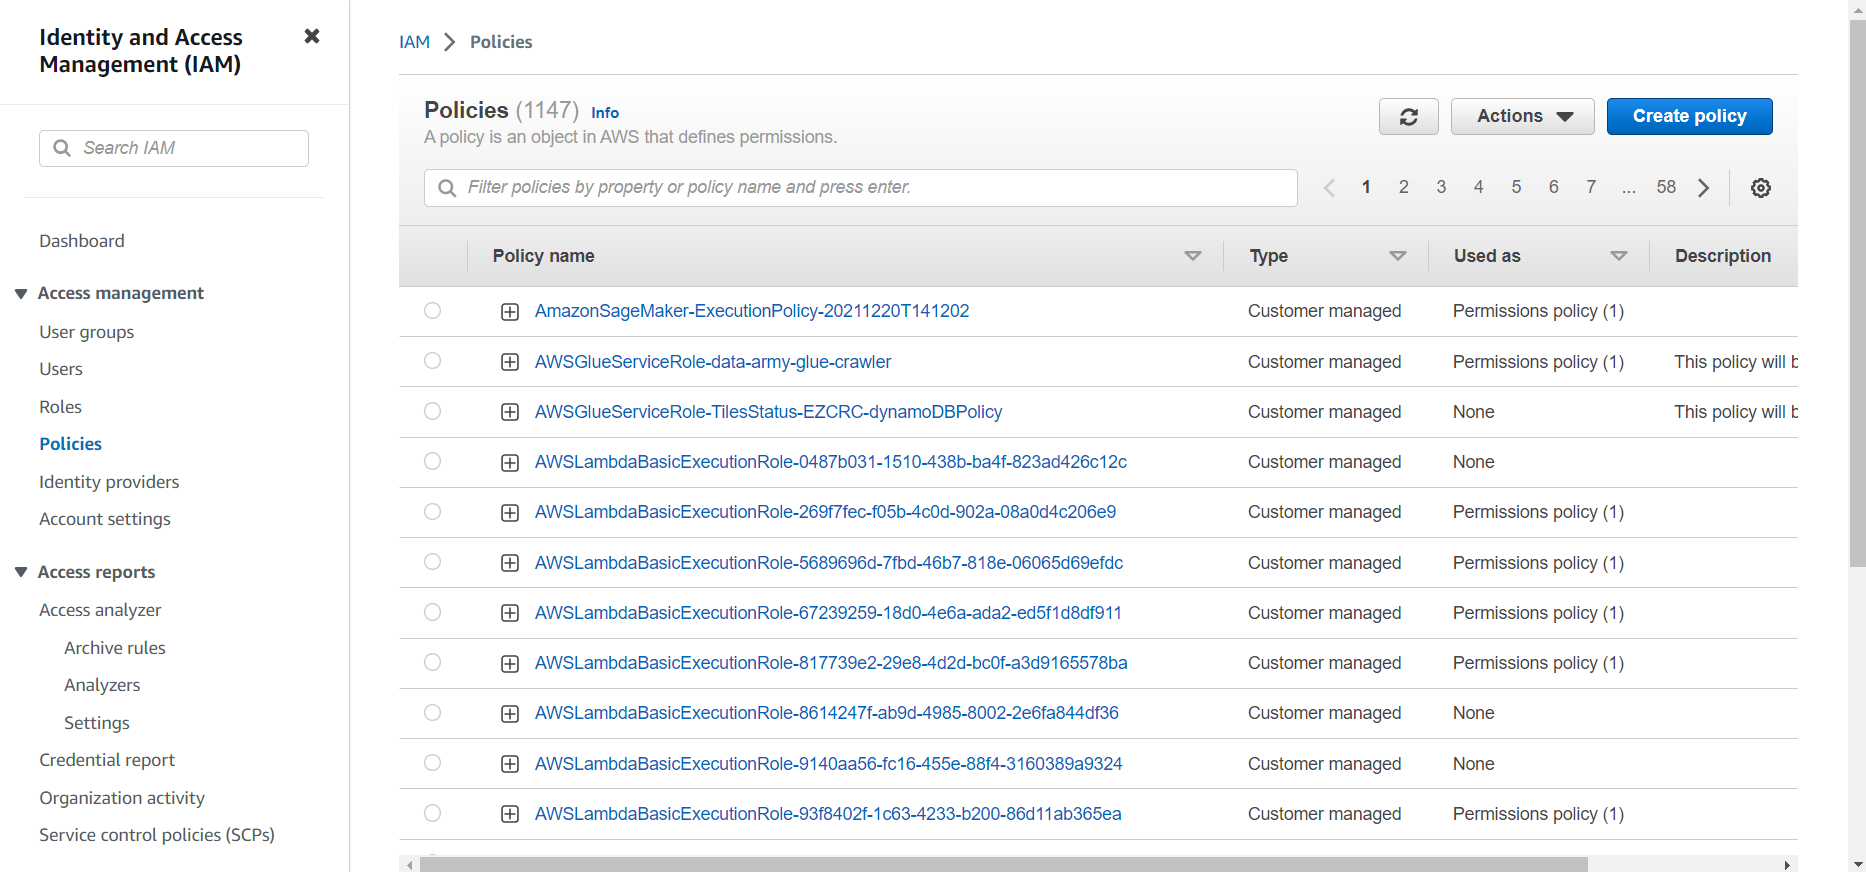
6. Click the JSON tab.
7. Add a policy document that will allow Snowflake to access the S3 bucket and folder.
The following policy (in JSON format) provides Snowflake with the required permissions to load or unload data using a single bucket and folder path. You can also purge data files using the PURGE copy option.
Copy and paste the text into the policy editor:
Note: Make sure to replace bucket and prefix with your actual bucket name and folder path prefix.
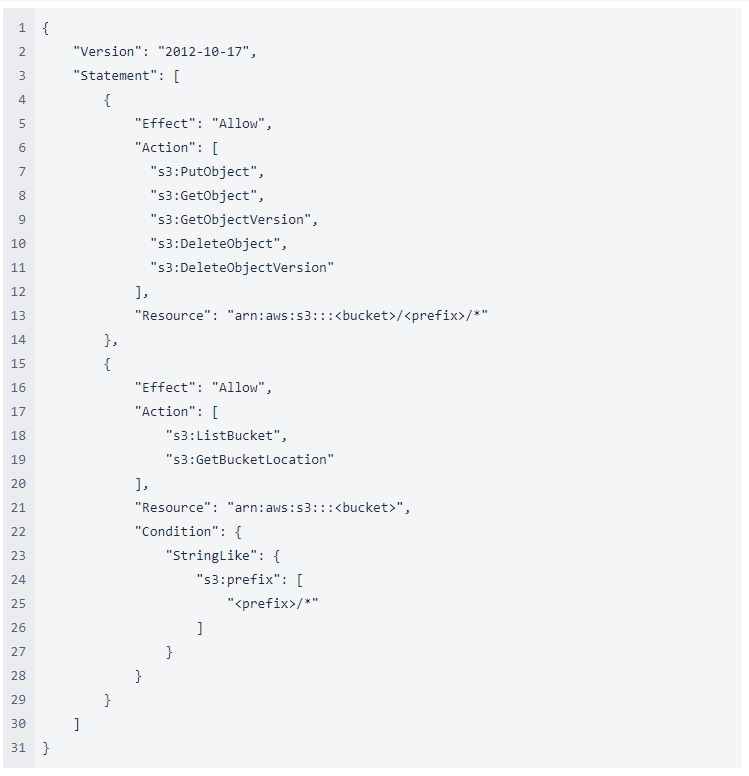
Note: Setting the “s3:prefix”: condition to either [“*”] or [“<path>/*”] grants access to all prefixes in the specified bucket or path in the bucket, respectively.
8. Click Review policy.
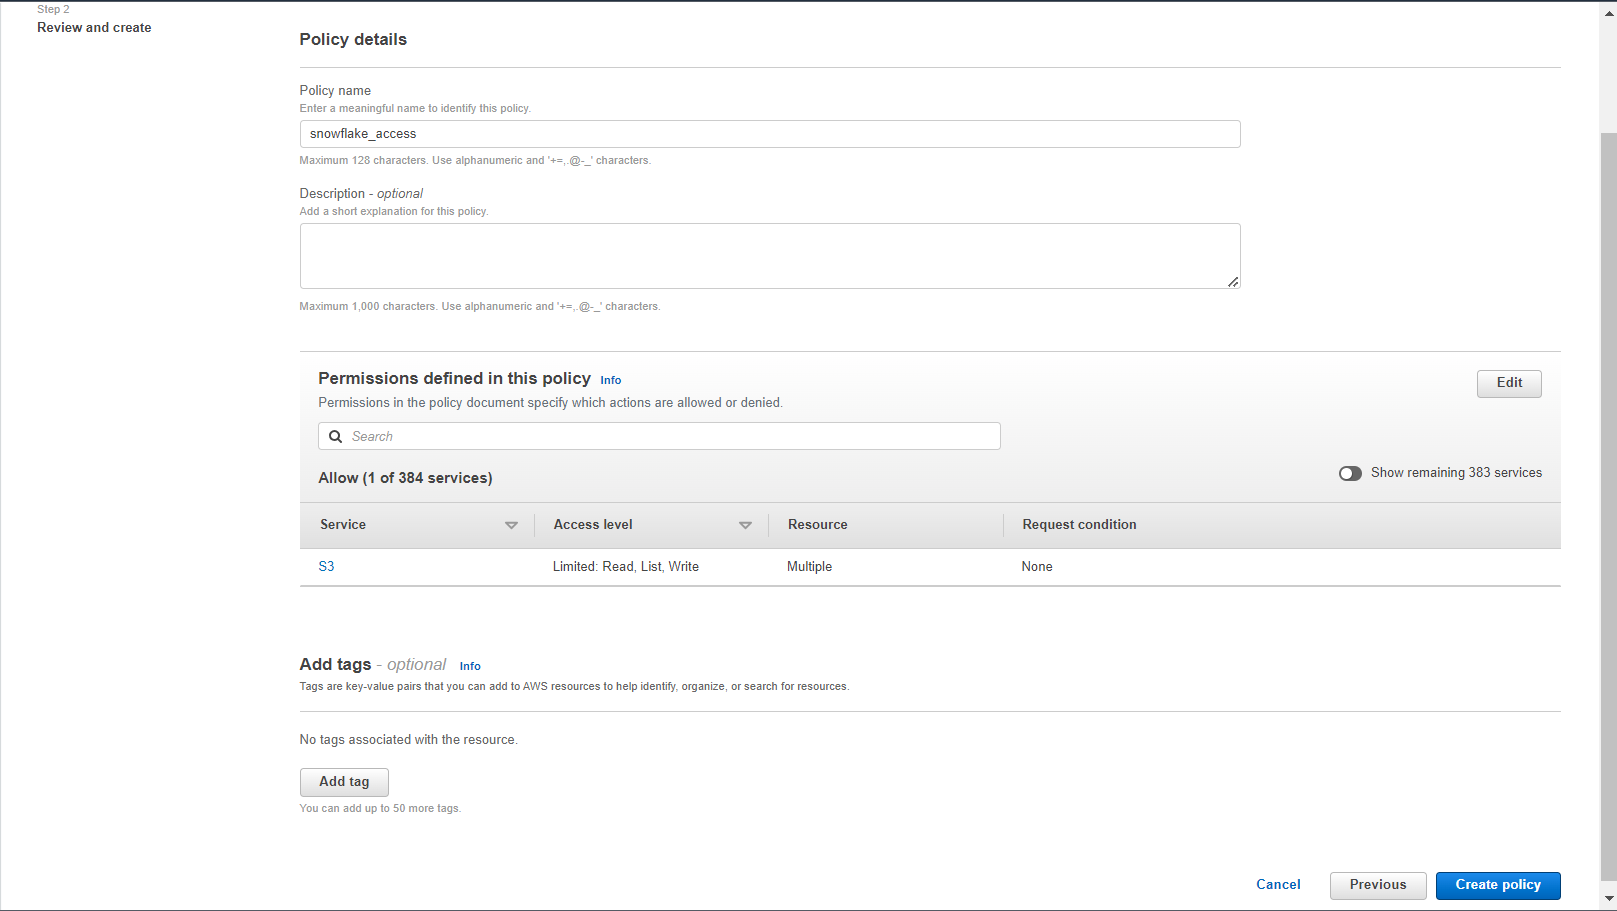
9. Enter the policy name (e.g. snowflake_access) and an optional description. Click Create policy.
10. Choose Roles from the left-hand navigation pane.
11. Click the Create role button.

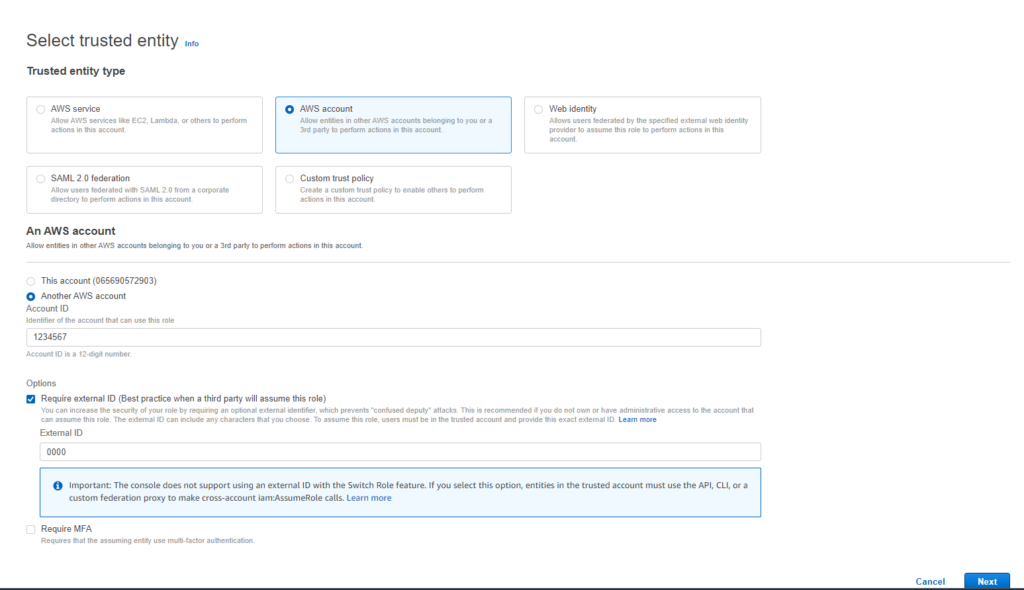
12. Select AWS account as the trusted entity type.
13. In the Account ID field, enter your own AWS account ID temporarily. Later, you will modify the trusted relationship and grant access to Snowflake.
14. Select the Require external ID option. Enter a dummy ID such as 0000. Later, you will modify the trusted relationship and specify the external ID for your Snowflake stage. An external ID is required to grant access to your AWS resources (i.e. S3) to a third party (i.e. Snowflake).
15. Click the Next button.
16. Locate the policy you created in Step 1: Configure Access Permissions for the S3 Bucket (in this topic), and select this policy.
17. Click the Next button.
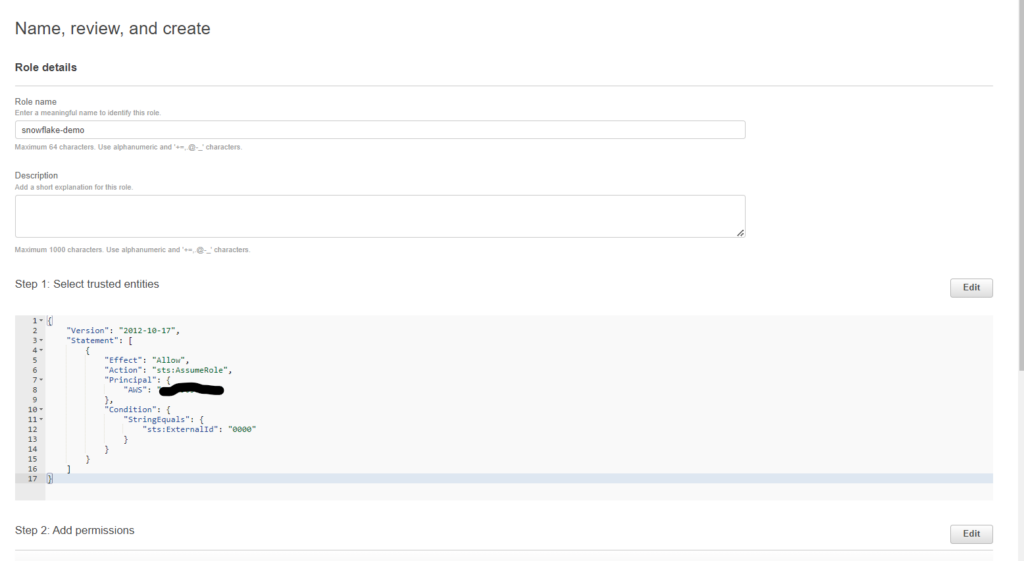
18. Enter a name and description for the role, and click the Create role button.
You have now created an IAM policy for a bucket, created an IAM role, and attached the policy to the role.
19. Record the Role ARN value located on the role summary page. In the next step, you will create a Snowflake integration that references this role.
Step 3 – Create a Storage Integration on Snowflake
Create a storage integration using the CREATE STORAGE INTEGRATION command.
A storage integration is a Snowflake object that stores a generated identity and access management (IAM) user for your S3 cloud storage, along with an optional set of allowed or blocked storage locations (i.e. buckets).
Cloud provider administrators in your organisation grant permissions on the storage locations to the generated user. This option allows users to avoid supplying credentials when creating stages or loading data.
A single storage integration can support multiple external (i.e. S3) stages. The URL in the stage definition must align with the S3 buckets (and optional paths) specified for the STORAGE_ALLOWED_LOCATIONS parameter.
Note: Only account administrators (users with the ACCOUNTADMIN role) or a role with the global CREATE INTEGRATION privilege can execute this SQL command.

Where:
- integration_name is the name of the new integration.
- iam_role is the Amazon Resource Name (ARN) of the role you created in Step 2 in AWS (in this topic).
- bucket is the name of a S3 bucket that stores your data files (e.g. mybucket). The required STORAGE_ALLOWED_LOCATIONS parameter and optional STORAGE_BLOCKED_LOCATIONS parameter restrict or block access to these buckets, respectively, when stages that reference this integration are created or modified.
- path is an optional path that can be used to provide granular control over objects in the bucket.
Step 4 – Link Snowflake Storage Integration to AWS IAM Role
Execute the DESCRIBE INTEGRATION command to retrieve the ARN for the AWS IAM user that was created automatically for your Snowflake account:

Where:
integration_name is the name of the integration you created in Step 3: Create a Storage Integration on Snowflake (in this topic).
Record the following values:
| VALUES | DESCRIPTION |
| STORAGE_AWS_IAM_USER_ARN | The AWS IAM user created for your Snowflake account, arn:aws:iam::123456789001:user/abc1-b-self1234 in this example. We provision a single IAM user for your entire Snowflake account. All S3 storage integrations use that IAM user. |
| STORAGE_AWS_EXTERNAL_ID | The external ID that is needed to establish a trust relationship. |
You will provide these values in the next section.
Step 5 – Grant the IAM User Permissions to Access Bucket Objects
The following step-by-step instructions describe how to configure IAM access permissions for Snowflake in your AWS Management Console so that you can use a S3 bucket to unload data:
1. Log into the AWS Management Console.
2. From the home dashboard, choose IAM

3. Choose Roles from the left-hand navigation pane.
4. Click on the role you created in Step 2: Setting up your Cloud environment (in this topic).
5. Click on the Trust relationships tab.
6. Click the Edit trust relationship button.
7. Modify the policy document with the DESC STORAGE INTEGRATION output values you recorded in Step 4: Link Snowflake Storage Integration to AWS IAM Role (in this topic):
Policy document for IAM role
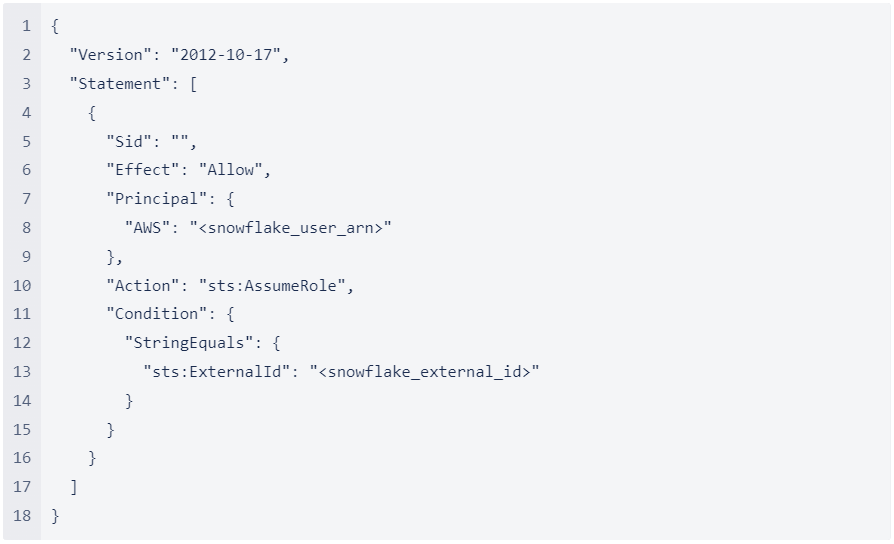
Where:
- snowflake_user_arn is the STORAGE_AWS_IAM_USER_ARN value you recorded.
- snowflake_external_id is the STORAGE_AWS_EXTERNAL_ID value you recorded.
8. Click the Update Trust Policy button. The changes are saved.
Step 6 – Set up Snowflake to Extract to AWS
Option 1: Non-Reader Accounts:
If using a paid Snowflake Account, create an external (i.e. S3) stage that references the storage integration you created.
Note: Creating a stage that uses a storage integration requires a Snowflake role that has the CREATE STAGE privilege for the schema as well as the USAGE privilege on the storage integration.
For example:

Where:
- integration_name is the name of the integration you created in Step 3: Create a Storage Integration on Snowflake (in this topic).
- myrole is the name of the Snowflake role you are using for this process
1. Create the stage using the CREATE STAGE command.
For example, set mydb.public as the current database and schema for the user session, and then create a stage named my_s3_stage. In this example, the stage references the S3 bucket and path mybucket1/path1, which are supported by the integration. The stage also references a named file format object called my_csv_format:

Where:
- integration_name is the name of the integration you created in Step 3: Create a Storage Integration on Snowflake (in this topic).
2. Use the following code to create a scheduled Task to unload the Snowflake Marketplace data to your S3 bucket –
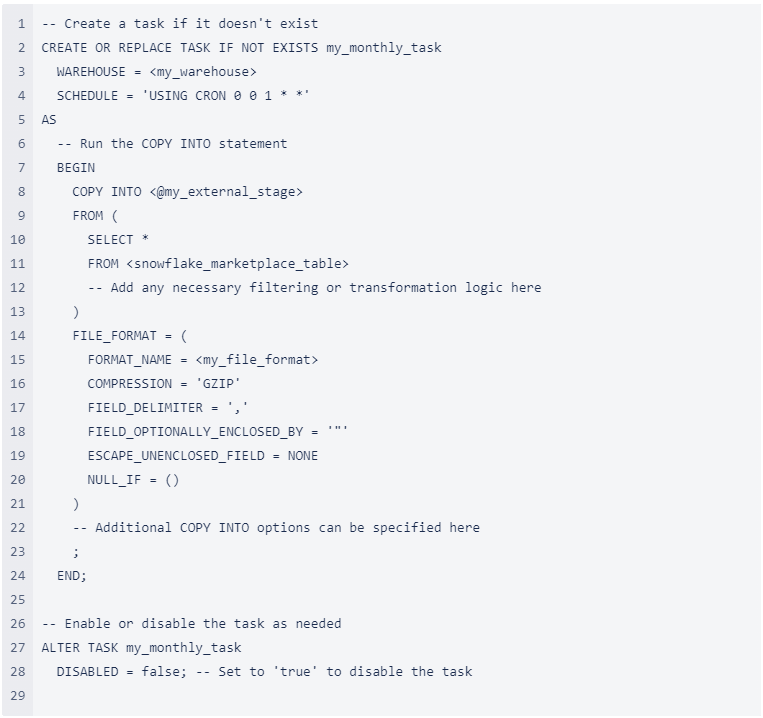
Where
- my_file_format should be a file format you have created. See these instructions for creating a file format – CREATE FILE FORMAT | Snowflake Documentation
- my_external_stage is the stage you created in the prior script to this one.
Note: update the schedule according to your requirements. the format here is cron
Option 2: Reader Account:
If using a Reader Snowflake Account, use the following code to unload to S3-
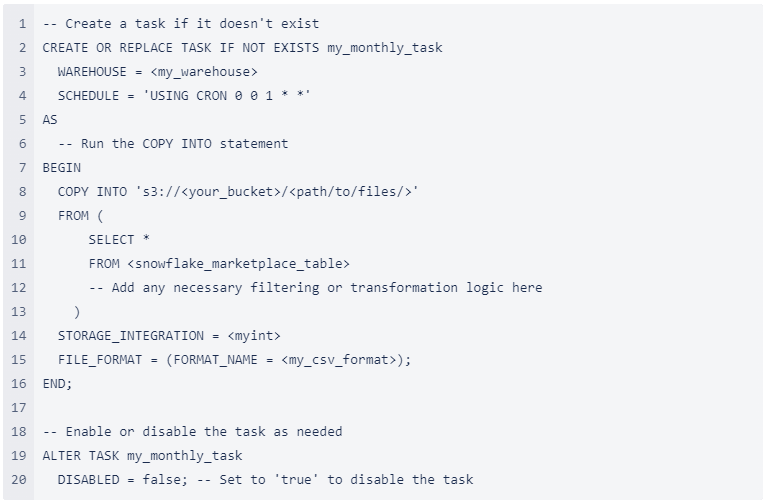
Where
- my_file_format should be a file format you have created. See these instructions for creating a file format – CREATE FILE FORMAT | Snowflake Documentation
- your_bucket is the AWS Bucket from Step 2 – Setting up your Cloud environment
- path/to/files/is a location from the AWS Bucket from Step 2 – Setting up your Cloud environment
And that’s it. You now have a scheduled Task to unload (copy) data out of the Snowflake Marketplace into your Cloud provider.
If you have a Reader Snowflake Account then there is no cost to run the Task. If you have a paid account, you will pay for the compute required (processing time) by the Warehouse which will vary by data listing on the Marketplace.
